A screenshot, also known as screen capture, or screengrab, is a digital image that shows a computer display’s contents. A screenshot create by the operating system or software running on the device powering the display.
Our computer screen shows us such exciting information that sometimes we would love to save everything we see. Surely you already know how to take a screenshot on your mobile.
Would you also like to learn how to capture what appears on your computer screen? Follow this tutorial to take screenshots on Windows 10 and MAC:
Table of Contents
How to Take a Screenshot in Windows 10?
Did you recently download Windows 10 and want to learn how to take a screenshot? If you previously knew how to do it in the old version, we have good news for you, because not much has changed from the previous version of Windows. We show you some simple options to take a screenshot in Windows 10 and save it on your PC:
1. Make a Screenshot of the Full Screen
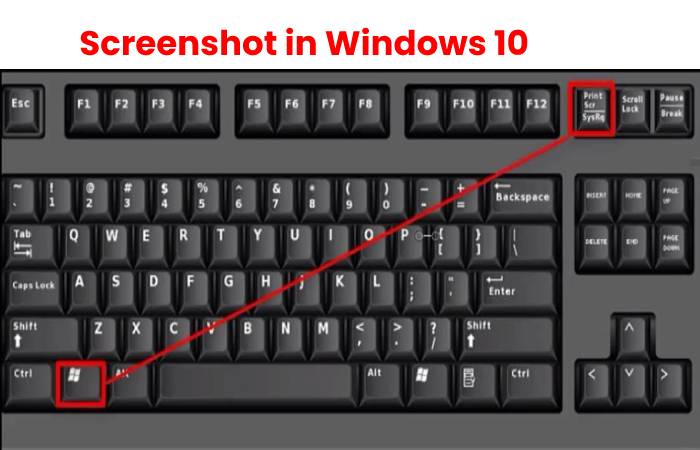
- With this model, you can capture everything you see on your computer screen and save it as an image. Look for the ‘Print Screen’ or ‘Prt Scr’ key, usually located at the keyboard’s top right, next to the F10, F11, F12?
- Let what you want to capture appear on the screen and press the ‘Print Screen’ button. Everything you see on your screen will save to your computer’s clipboard.
- To view it, access the program in which you want to paste it and click on the paste button or press Ctrl + V.
- For example, you can paste it directly into Paint or any program in the Office package (Word, Excel, PowerPoint), opening the application and pressing the ‘paste’ button.
- To save it as an image in your PC documents after pasting it in Paint, go to the menu file> ‘save as’ and save it with the name you want in. PNG format.
- If you want to save the screenshot as an image after having pasted it into Word, right-click on the image and choose the option ‘save as image.’
- Finally, if you prefer Photoshop to Paint as an image editor, save your screenshot by opening Photoshop and creating a new file in File> new.
- You will see that a blank screen appears with the measurements of the image you have captured. You need to paste the white canvas capture by pressing Ctrl + V or Edit> Paste, and that’s it!
2. Make a Screenshot of just one Window
- If you only want to capture the content of one of the programs you are using or of a window in your browser, press the ‘Alt’ key at the bottom left of your keyboard, and then, without releasing it, press ‘Print Screen.’
- In this way, you will be bright to capture what you are doing on your computer without seeing other open programs or the taskbar located at the bottom of your desktop.
3. Make a Screenshot of a Share of the Screen
- The most demanding users who wish to capture only a part of the computer screen will have to use the Snipping application, a program installed by default in Windows 10.
- Type in the quick access search engine located on the ‘snippet’ taskbar, and access the program.
How to Take a Screenshot on Mac?
Apple lovers can also get a screenshot on their Mac in a straightforward way. We explain the different ways to capture the entire screen or part of it:
1. Make a Screenshot of the Full Screen
- If you want to take a screenshot of the entire computer screen, press the ‘Command,’ ‘Shift,’ and ‘3’ keys. Your computer will take the capture and automatically save it to your desktop. PNG format.
2. Make a Screenshot of a Window
- If you only want to capture a specific window or program from your computer, press ‘Command’ ‘Shift’ ‘4’ and then press the space bar.
- Choose the window you want to capture with the mouse pointer, which will shape like a camera, and click with the mouse. Next, find you. PNG file on the desktop.
3. Make a Screenshot of a Share of the Screen
- Mac users will not have to use any program to capture a part of the screen.
- Press ‘Command’ ‘Shift’ ‘4’ and, with the crosshair pointer, manually select the square section you want to capture.
- Once you have selected the area, release the mouse, and your screenshot will automatically save to the desktop. If you are not satisfied with your collection, press ‘Esc’ and start your capture again.
How to Take a Screenshot on Galaxy?

Attractive a screenshot on a Galaxy S20 (or nearly any other Samsung Galaxy) with the wave of your pointer is very easy.
- To income a screenshot with Palm Swipe to Capture, you must primarily place your hand in this way.
- Then slide your hand from left to right, keeping the palm of your hand on the screen.
- If you do it right, you should texture a shaking.
Position your hand sheer to the left or right of the shade, as if you were successful in repetition karate with your cell phone.
Change your hand from left to right or from right to left across the screen, like a scanner. You should feel a shaking, see a screenshot animation that lights up the screen or obtain a notification that an image saves to the gallery.
It may take a few tries, but repetition makes perfect—this technique everything with Samsung phones that came out after 2013, including the Galaxy S4.
1. Buttons
Not everybody is a fan of gesture controls. Fortunately, most Android phones propose a more tactile technique of taking a screenshot.
- Take a screenshot with the buttons, place your fingers on the power key and the home button.
- Press and hold both buttons at a similar time.
- You should texture a vibration and see a screenshot animation if successful.
- You can checker the screenshot in the notification menu.
- Media the button on and start at the same time.
- Keep holding them for a second till you hear the camera’s sound, or until you see some graphic indication that the capture take.
- It will price your work first, but it will be one of the most straightforward tasks once you have understood the dynamics. You want to press the power button a bit before pressing the home button, and then you need to hold them down.
- This technique works with nearly any Samsung phone that has an obverse home button.
- If you have a Galaxy S20, Galaxy S10, or Galaxy Note 10, which don’t have a physical home button, the critical grouping is a bit different:
- Press and hold control and volume down buttons at the same time.
- Hold both buttons down for a second until you hear a shutter sound or see a visual indicating a photo taken.
- It would help if you held down the button slightly before pressing the button to lower the volume, then hold them down.
2. S Pen
- This technique is obtainable on the Galaxy Note 10 Plus and other Samsung devices with an S Pen.
- To take a screenshot this way, you must open the Air Command menu by pulling the S Pen stylus or placing the stylus on the screen and clicking the button.
- Select Screenwriting from the Air Command choices to take a screenshot.
- You can then write notes at the top of the image. There are choices on the top toolbar to change the pen color and size if you want to get creative.
- You can also erase or undo strokes, plus there’s a cropping option at the bottom.
- When you do, tap Share or Save at the bottom.
How to Take a Screenshot on other Android Devices
- Taking a screenshot on any other Android phone or tablet (other than a Samsung device) is pretty easy too.
- The method varies slightly depending on the model. However, the following procedure should work on all non-Samsung Android phones, but with Android 4.0 Ice Cream Sandwich or later.
- Press the button on the key and the volume down at the same time.
- Hold them down until you hear a click or a screenshot sound. You should also see a small capture animation.
- You will receive a notification of the screenshot, and you can share or delete it.
- By default, your screenshots save in your Photos or Gallery app in a different folder.
- If you’re using Android 10, you can also press and hold the power button to get a screenshot option to appear on the screen.
- If you choose to oversee the screenshot from the notification bar, you will also see that you can mark it, which is ideal if you want to highlight something specific.
- For older Android phones, like the ones using 2.3 Gingerbread, you need to head over to the Google Play Store, where several apps will capture a screen on your behalf.
- Easy Screenshot and ER Screenshot are popular options, but you may need to check your phone. You can also appear at No Root Screenshot if you don’t want to link your device.
Also Read: What is a Company? – Works, Types, and 10 Steps to Start-Up

What are Speed Lines? – Understanding, How to Draw, and More
What are Speed Lines? Speed lines are a technical analysis tool developed by Edson Gould, a technical analyst who became…

Transforming in the Digital Era: Advantages for Companies
At the beginning of this article, it is essential to point out that digital transformation has become a major topic…
Review How to Take Screenshot in Windows 10, MAC, and More.